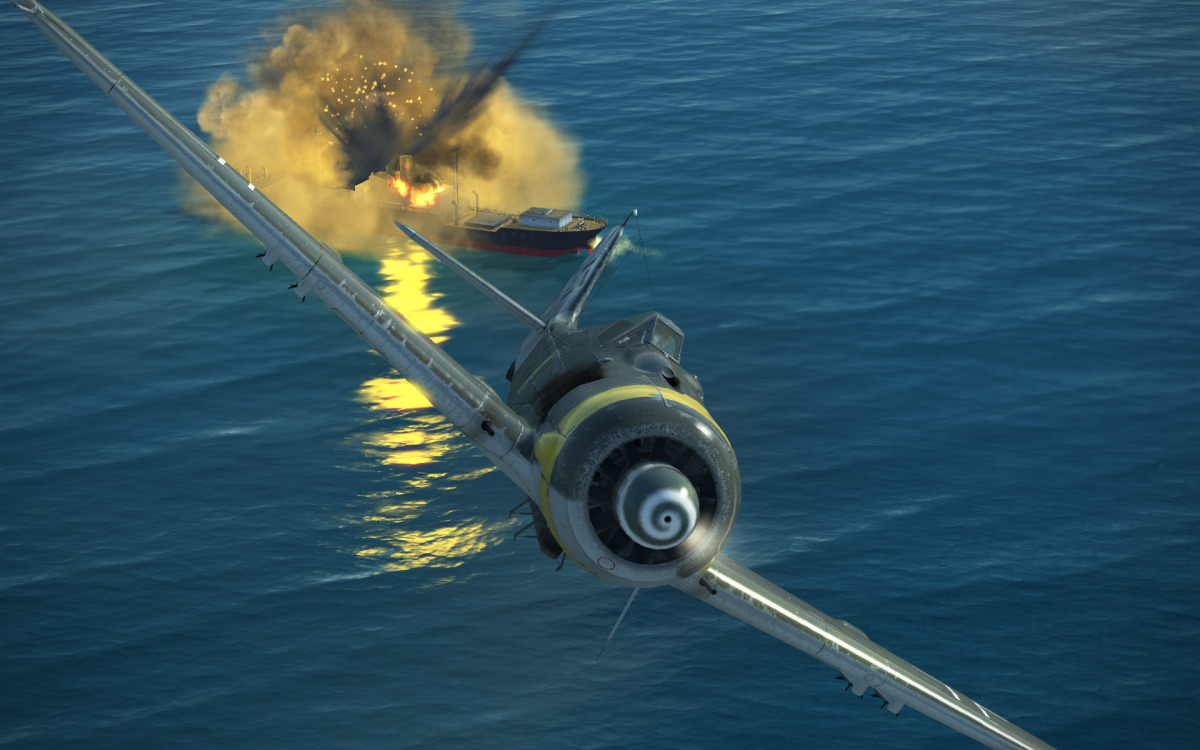
In my previous "Denmark Strait" battle, that I wrote part way through drawing the Special Projects ships, I have the battle occurring in August of 1941 rather than May 1941. Having the Battle in August 1941 allows me to introduce the FW-190A to the Germanic States Navy. The FW-190A is far superior to the Gloster Griffon (F.34) which I have as the Royal Navies main fighter aircraft. Fill the Axis Combined Fleets (North) aircraft carriers with FW-190A fighters and the Germans have an aircraft that will stop the Allied Fleets aircraft from attacking their ships. The Germans simply shoot them out of the sky. But..... to achieve this superiority the German aircraft carriers are filled with fighters, no attack aircraft of their own. It is up to the battle line to inflict the damage on the Allied Fleet.
Thus I am able to engineer a meeting of battleship -v- battleship duel in the upper North Atlantic. That was the setting I started with and pretty much ignored the happenings around the rest of my Alternate World.
I should try to keep things consistent, but I do have a lot of fun imagining different scenarios and ships to fill them. With this one, Denmark Strait August 1941, I should remember that I have 'Scandinavia' as a participant with their ships available to aide the Germanic States and create the Axis Combined Fleet (North). The (South) fleet would be the Italians, Iberians, Galician's and any captured ships based in the Mediterranean. As I have the Iberians and Germans take Gibraltar and close off that end of the Mediterranean to the Allies those forces can project sea power into the Central Atlantic. But again airpower in the shape of the carriers of Force H keep the Axis (South) fleet trapped in the Mediterranean. The South fleet does not have its own aircraft carriers so can not protect their battle line out of sight of land.
So if I give the Germanic States all of the advantages which could have come their way, what is the State Of The World?
North Africa: Rommel is just finishing off the Desert Armies and pushing through Egypt to the Suez Canal. Malta had fallen to the Parachute Division in 1940. Nothing to interfere with supplies from Italy to North Africa. Turkish troops were coming south through Lebanon and Palestine. The French Fleet trapped in the Mediterranean scuttles itself, over 80 good ships gone. The Jean Bart is scuttled but the Richelieu and the rest of the Vichy Atlantic Fleet sail to the Caribbean and join the Bearn and other units at Ille de France. The British destroy the Suez Canal so the Axis Fleets can not exit the Mediterranean. It will take the Axis more than a year to repair the damage. The fate of the world has been sealed before that happens.
Russia: without the interference of the Balkan Campaign, the Germans are able to attack Russia in May 1941 with its full forces on a very broad front. Scandinavian forces attack and take Leningrad, then moving South and East to cut off Moscow. The German, Hungarian, Galician and others forces attack from Polithstovia in the North to Galicia in the south, and best of all for the Germans, Turkish and German troops attack into the Caucasus from Eastern Turkey and take the precious oil fields. Russia is on its knees. August 1941, Moscow falls and Russia surrenders. All the untapped resources of Siberia are the Germans to command.
The Commonwealth Forces have never felt more alone. It is another four months before the Japanese attack at Pearl Harbour and the full forces of the United States can join with the Commonwealth. It will then be a race to see who can develop the doomsday weapons first. Without interference Germany has a very good chance of winning that race. The Germans have that four month window to solve the 'British' question. Take the British Isles and the United States will have no launching pad for an invasion of Europe. To that end an all out assault on the Allied Fleets to starve the British Isles by sinking the convoys that are the lifeblood of Britain must be made. Lend Lease must be broken.
Axis Combined Fleet (North) must break out into the North Atlantic and sink convoys. Nothing else is acceptable.
Will we end up eating sausage and drinking our beer out of steins? (Does not sound too bad put that way)
So what are the opposing forces?
Axis Combined Fleet (North)
Admiral Albrecht in command with his Flag on Bismarck
2 x Graf Zeppelin (80air)
1 x Freya (60air)
2 x Seydlitz Class (6x16.5")
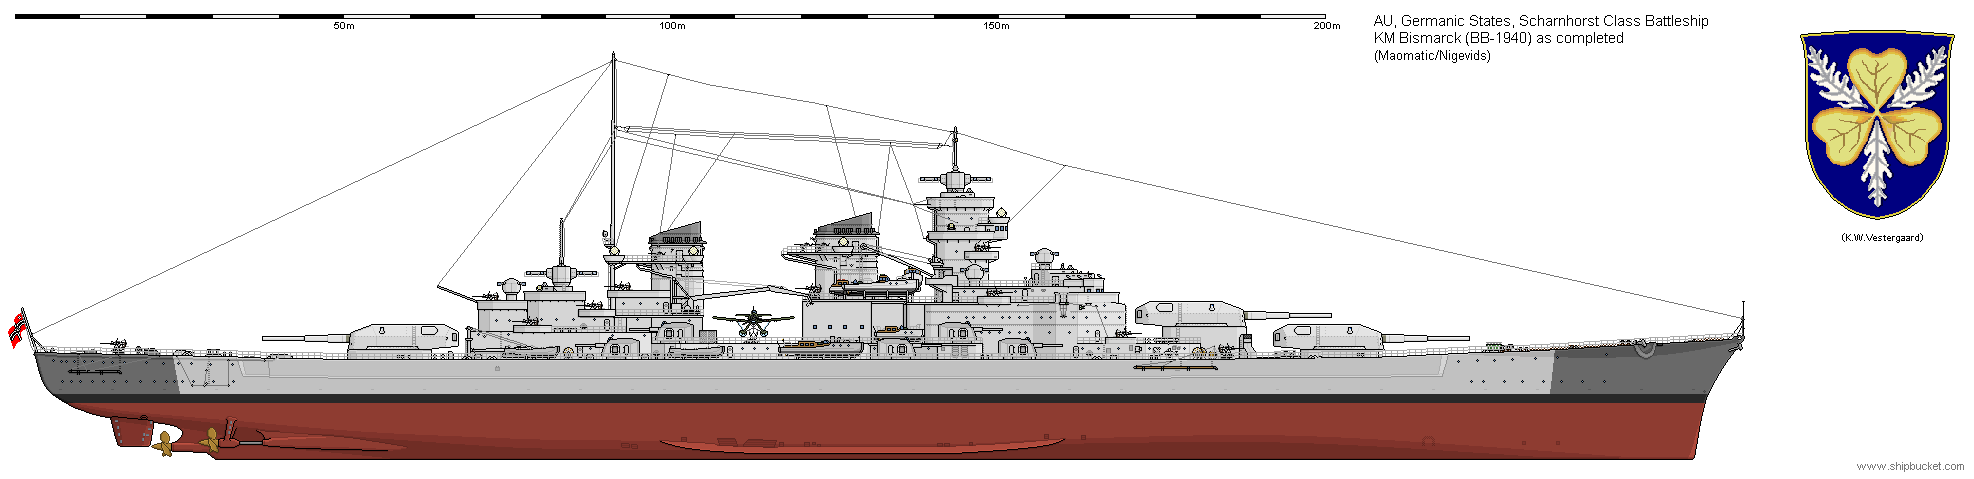
4 x Scharnhorst Class (9x16.5")
2 x Kung Gustav (9x15.8")
3 x Odin (8x15.8")
2 x Prinz Eugen class (12x8.2")
2 x Tre Kronor (12x8.3")
1 x Prinz Eugen class (8x11")
2 x Leipzig Class (12x5.9")
4 x Halogaland (12x5.9")
4 x Smaland (8x5.1")
8 x Z25 Class (8x5.1")
Faeroes Gap Force
1 x Richtoften (44air)
2 x Ostereich (8x12")
1 x Leipzig Class (12x5.9")
4 x T75 Class (6x5.1")
While more ships were available, there were other duties that needed to have ships fulfil them.
A pretty well balanced fleet. Where the Germans cheated was to fill the aircraft carriers with FW-190A fighters that could be fitted with bombs or drop tanks to make it a very versatile aircraft. Far superior to anything on the British carriers.
North Atlantic Cover Force (sub unit of the Home Fleet)
Admiral Holland in command with his Flag on Vanguard
.png)
2 x Illustrious Class (84air)
2 x Ark Royal class (70air)
1 x Apollo Class (70air)
2 x Unicorn (40air)
2 x Anson Class (10x16")
3 x Majestic Class (12x15")
2 x King George V (9x15" version)
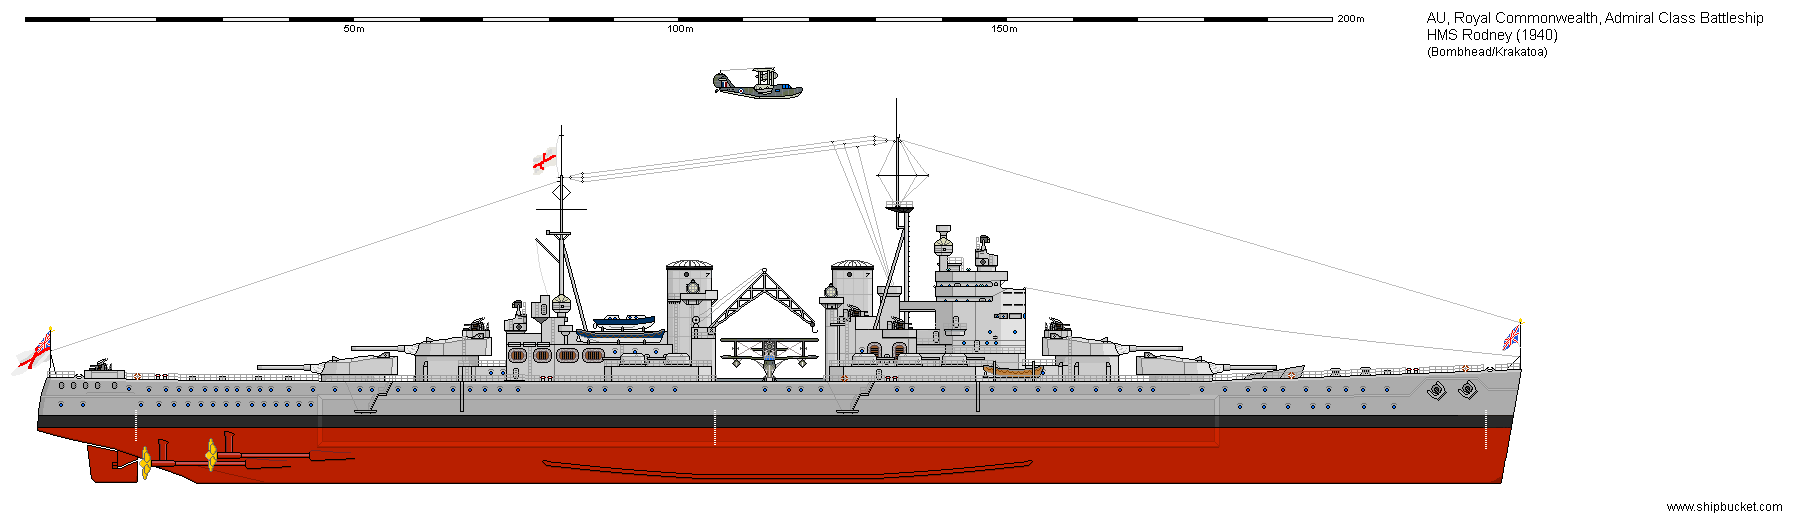
2 x Vanguard Class (9x16" version)
1 x Devastation (9x15")
1 x St George (8x15")
2 x Loire Class (12x13")
1 x Warrior Class (8x14")
1 x Glorious Class (8x14")
2 x Lancaster Class (9x8")
4 x Exeter Class (9x8")
4 x Sirius Class (9x6")
6 x Dido Class (10x4.5")
20 x JKLMN Class (6x4.5")
5 x Tribal Class (8x4.5")
In harms way
4 x County Class (9x8")
The Allied Commander knew his fleet was superior to what the Axis could muster and that if the Axis forces wanted to come out and play they would get a beating they would never forget!!
Other forces were at Scapa Flow. Those forces were the replacement ships for the cover force. Two weeks stand down then another four weeks at sea. If any of the Axis forces broke through into the Atlantic it would be these ships and also the ships of Force H that would be tasked with finding and sinking them. Good luck with that.
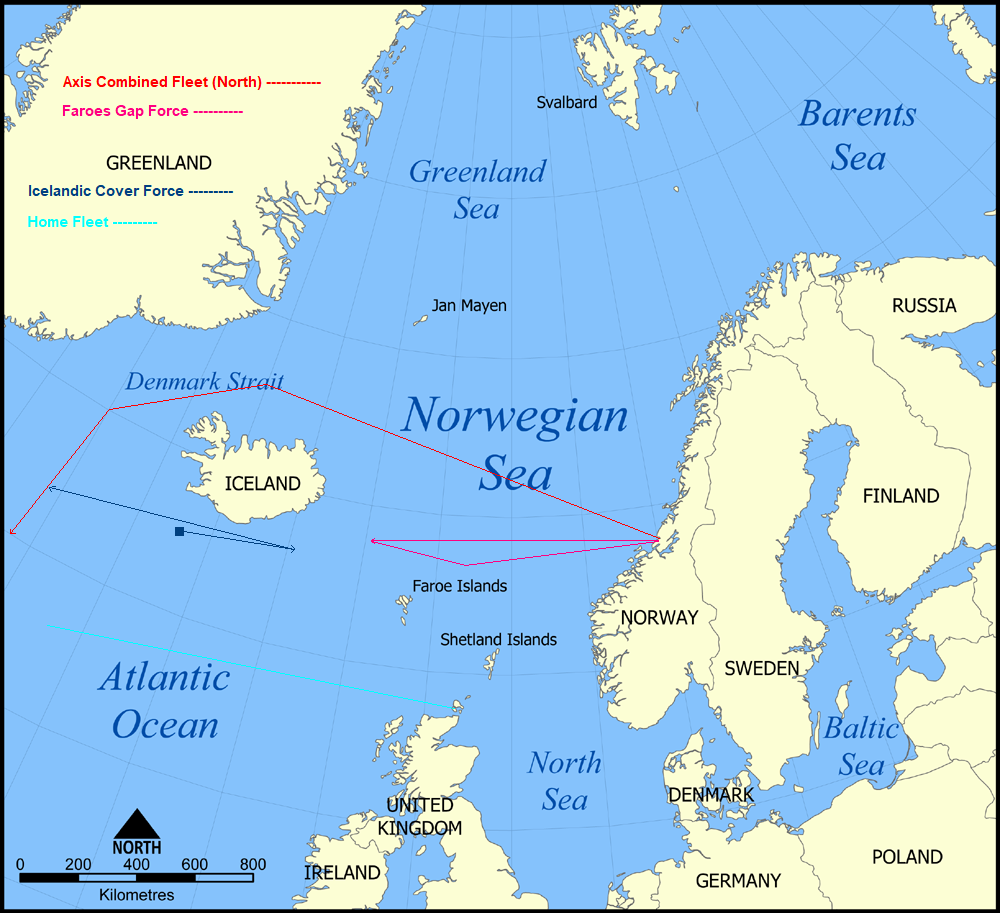
Admiral Holland sits on the bridge of the brand new battleship Vanguard, this is the culmination of his career, command of a fleet. And what a fleet it is. Two lines of battleships, with more firepower than Jellicoe commanded at Jutland. The seven carriers have a pair of battlecruisers as minders, while cruisers and destroyers surround the armoured core searching for enemies from any direction. The fleet has an east-west patrol line and is there to cover the Denmark Strait and Iceland - Faroes Gap. Admiral Holland has two heavy cruisers in both channels. These are his early warning trip wires. The cruisers can send warning and shadow any fleet movements through their channel. The Skua's are the recon aircraft, but the top end of the channels, where the cruisers are, is the far end of their endurance.
Admiral Holland's counterpart, Admiral Albrecht, sits on the bridge of his near new battleship Bismarck. Like Admiral Holland, he is also commanding more firepower than Admiral Scheer had had at his command. What put Admiral Albrecht in a happy mood in that four of the battleships he commands are better than anything in the British battle line. The difference is in the main armaments. All of his battleships have 15.8" or better. The crown jewels are the 16.5" guns on six of his ships. These guns fire a shell nearly 600 pounds heavier (1400kg shell) than the Mk.2 16" (2500 pound shell) aboard the British 16" ships. Admiral Holland and the ship commanders of his forces are going to get a rude awakening when those big boys hit their ships.
An early morning message arrives for Admiral Holland from the Admiralty. The early recon aircraft visit to the Norwegian ports has found the ports empty, The Axis forces are at sea.
The Admiral, Flag Captain and Fleet Navigator retire to the pilot house where they can speculate and lay out the various courses and time lines as to where the Axis Fleet could have got to. While the speculation goes on another message is brought in for the Admiral. Cornwall to Flag, under attack by German battlecruiser, this position. The position is plotted and it is near the northern end of the Faroes Gap. Another messenger arrives. Roxburgh to Flag, under attack by German battlecruiser this position. The position is about 18 miles away from the Cornwall. Flag to Cornwall and Roxburgh, shadow and report.
A stream of reports come in from the two cruisers. They are not shadowing, they are running for there lives. The sea state is moderate and the German battlecruisers are making better speed than the cruisers. The range is closing slowly but surely. A hit on Roxburgh, closely followed by two more, Roxburgh signals a speed reduction due to damage and says 'goodbye'. The Ostereich closes on Roxburgh and finishes it off. Once Roxburgh has sunk and is no longer a threat, the Ostereich sends boats into the oil slick to recover any survivors they can find. The Cornwall is also reporting hits and near misses, then stops reporting. The von Roon has fulfilled its mission also. Clear out the patrol cruisers out of the Faeroes Gap.
Admiral Holland orders the fleet to proceed east toward the last known positions of the sunken cruisers. A polite request to the Admiral in charge of the carriers. "Find those battlecruisers!" and of course find the German Fleet that could be coming through the gap behind them. A dozen recon Skuas are sent off to the Northeast. A further order, range a strike to sink those battlecruisers if an opportunity presents itself. It is still not quite 11am. Another 10 hours of daylight left. A lot can happen yet. Just over an hour later a recon report come in "Two German battlecruisers spotted at this position". A minute later, "fighters coming in....." end of report.
For fighters to be over the battlecruisers the Axis main fleet must be nearby with its carriers. Orders to the other recon aircraft "Find where those fighters came from".
Admiral Holland is in a quandary. With the fighters over the battlecruisers he is fairly sure the Axis Main Fleet is nearby. Everything takes time. Even if he launched the strike against the battlecruisers now it would be almost 2pm before the attack would go in. A quick conversation with Admiral Lister aboard Illustrious and the strike on the two battlecruisers is given the go ahead. Sixty aircraft are launched. As long as the battlecruisers are away from the main fleet a strike force of sixty should be enough. That also leaves nearly 400 aircraft still available for a strike on the main Axis Fleet once they are located.
Back to the waiting. More of the recon aircraft stop sending reports from in the same area as the battlecruisers, and the final six aircraft are on their way back having discovered nothing further and reached 'bingo' fuel levels. So what is out there? The carrier von Richtoften, a cruiser and four destroyers are keeping out of range, while the two battlecruisers Ostereich and von Arnim head toward the carrier at 25 knots. For Admiral Lutjens, in charge of the group, it is also a time of guessing. He knows when his battlecruisers sank the patrol cruisers, he knows when his ships were reacquired by the recon aircraft. What he does not know is the gap of time between when his ships are sighted again and when a strike force would be launched against him. He has the Richtoften to the north of him with forty odd FW-190A fighters aboard. The six odd aircraft are the CAP (combat air patrol) around the von Richtoften and his battlecruisers. The other 40 aircraft are what he is going to need to be very close to his ships when the British air strike arrives. Admiral Lutjens is certain the British will send a strike force as they will not want his two ships to sink the two patrol cruisers without some form of retribution. Admiral Lutjens gives it another ten minutes then orders the Richtoften to launch the fighters. Too early and the fighters will run out of fuel before the strike arrives, too late and the British strike will attack his ships unmolested. All the Germans can do is to fit drop tanks on the FW-190A's to give them a longer loiter time.
The two aircraft CAP over the battlecruisers make the report: "large number of aircraft to the west coming toward". In the strike force are fifteen Griffon fighters, 20 Skua dive bombers and 25 torpedo bombers. It is the torpedo bombers Admiral Lutjens fears. They are the ones that can do the damage to his ships that will mean he can be caught by the British capital ships that cannot be too far away. The orders to the forty fighters are easy. Get the torpedo bombers first then finish the rest. That is exactly what they did. Thirty fighters go for the torpedo bombers only four of which get to a position to launch and only two remain to make it back to the fleet. The torpedoes are avoided but this tactic has left the two battlecruisers open to the dive bombers. Down they go. Just as they are reaching their release points the ten remaining FW-190A's reach them and cause a lot of early releases as the Skua's strive to survive. Only four remain to get home. But they are the ones that hit the battlecruisers, four hits, two on each. The hits do no critical damage. The bombs the Skua's carry are just too light (500 pounders) to pierce the heavy deck armour of the battlecruisers. The Griffons had their chance at the FW-190A's when they went for the torpedo bombers managing to shoot five down. That was their moments of fame. Once the Focke Wulf's had finished with the torpedo bombers they turned on the Griffons and savaged them like the wolves they were. Only two of the Griffons survived.
The result is that Admiral Holland still has no idea where the main Axis Fleet is. When he hears that only eight of the 60 strong strike are returning, he can only wonder what has gone wrong.
Admiral Albrecht makes his run. Sitting just out of the mouth of the Denmark Strait, Axis Combined Fleet (North) is going to take 15 hours at 20 knots to transit through the Strait and exit into the North Atlantic. It is now 3pm. The Admiral has heard from Admiral Lutjens and is glad that that red herring had borne fruit. Lutjens force had dragged the Allied Icelandic Cover Force toward the Faroes Gap, exactly as intended. Admiral Albrecht has the two smaller battleships Seydlitz and Hindenburg sweeping through the Strait two hours ahead of the fleet to find and sink the patrol cruisers that would be somewhere around the narrowest point of the Strait.
Admiral Holland's day gets worse. Suffolk to Flag, in contact with German battleship, engaging. A few minutes later. Norfolk to Flag, being fired on by German battleship. Deja vu? Is this the Axis fleet or are they still coming toward him through the Faroes Gap? Admiral Holland can't make the decision to turn for another 15-20 minutes while the survivors of the battlecruiser strike land on the carriers. Admiral Holland has that long to make up his mind. He could talk to his two other Admirals in the fleet, Lister in the carriers and Burnett with the cruisers but they had no more information than he had. Admiral Lister comes up on the radio and tells Holland that the Germans had a new mark of fighter aboard their carriers, superior to the Griffons. The other piece of information is that the report from the Strike Leader, who had survived, was that the number of fighters they had faced were only enough to have come from one large or two smaller aircraft carriers. He was fairly certain that if the Germans had had more fighters to ambush his strike force they would have sent them. His force would have been completely wiped out if there had been another ten German fighters. It is the best information Admiral Holland has to go on. His orders to the Flag Captain to pass to all ships, "once the aircraft have landed on we turn to course 280 and increase fleet speed to 22 knots". The chase is on.
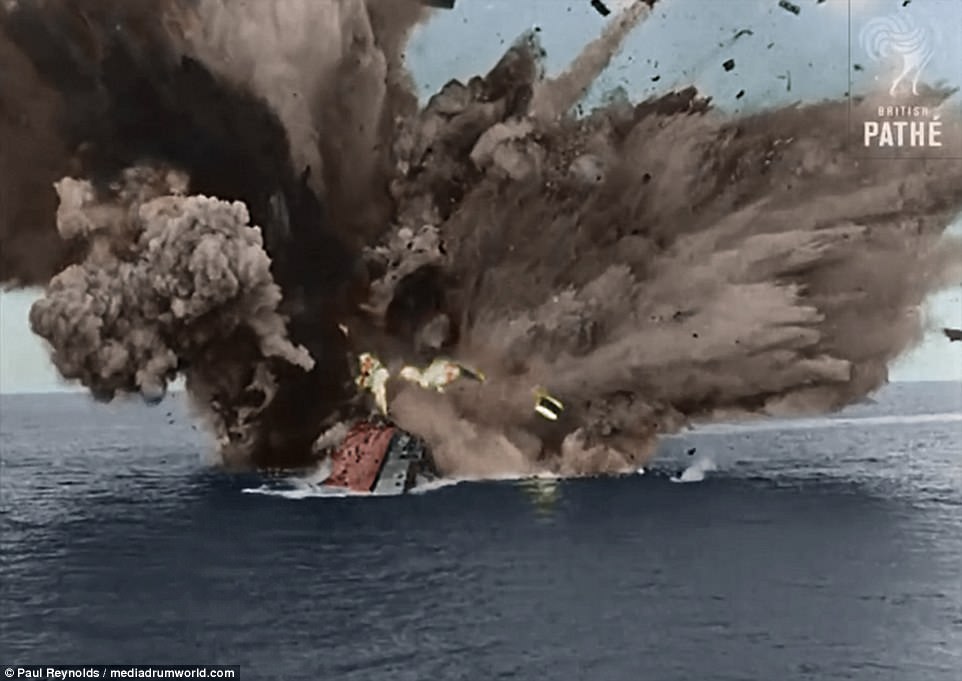
Up in the Denmark Strait the Suffolk and Norfolk are in trouble. The German ships are faster than them. It is also the first time a British ship is hit with a 16.5" shell. The results for Suffolk are indescribable. The aft end of the ship is shattered and the speed bleed away. Two more hits and the Suffolk is sinking. The Norfolk fares no better, four hits and the Norfolk has ceased to exist. Of the few survivors that have been picked up no one is sure just what went up, a magazine, the torpedoes, all they knew was the tremendous explosion that had shattered their ship. Both German battleships stop to help survivors but there are not many to find.
The two Seydlitz class proceed on at 15 knots so that the main fleet will catch up in a few hours. The German fleet is still out of range of a strike from the Fleet Air Arm and it will be dark before they come within range. Both Admirals are going to have to wait for the dawn and some recon aircraft reports to make further decisions on.
Before dawn the carriers on both sides are looking to launch recon aircraft. It is expected that both fleets will be fairly close to each other. The German commanders know they can stop the British recon aircraft from sending too full a report on the composition of the Axis Fleet (North) by having enough aircraft in the CAP to shoot down the recon aircraft. The reverse will not be the same as the FW-190A will outperform the Griffons of the British CAP and be able to see and report what is in the Allied Fleet. Air superiority is going to be crucial to the coming battles.
Both sides get the reports they want. The fleets are 180 miles apart and closing at a diagonal giving a closing speed of 30 knots. Just five hours steaming will see the fleets in sight of each other. The British recon aircraft cease to transmit, the German recon aircraft continue. Admiral Holland knows it is the German main fleet but not exactly what is there. In consultation with Admiral Lister the order for a full strike is given. All or nothing. Overwhelm the German defenders and then mop up the leftovers. The FW-190A recon aircraft report the strike assembling. More recon aircraft appear and the relieved aircraft shadow the strike force toward the German fleet. The Axis carriers know exactly when to launch their fighters and to give time for interception away from the fleet. The Allied air strike had to be launched in two lots of 200 aircraft. Getting 400 aircraft into the air took time and would mean that some would be short of fuel by the time the last was launched. Better to have two waves.

This also gave the Germans a problem, do they break up their fighter defences. Can they launch all of their fighters and have them with enough fuel to take the second wave also. Twenty minutes or more between waves would be enough to leave the fighters with little fuel to fight off the second wave. The second part was how many aircraft could they land on, re-arm, refuel, and then launch again. Just cruising the fighters do not use too much fuel. but in combat conditions they drink it like a thirsty camel. The strategy the Germans come up with is to launch their first 120 fighter with a drop tank to preserve as much of the internal fuel as possible and drop the tanks at the last moment before battle The second 90 strong wave would launch 15 minutes later, again with a drop tank and with those aircraft still able to fight, take on the second wave.. Both Allied waves would have about the same makeup. 72 fighters, 60 dive bombers and 72 torpedo bombers. The Germans split their fighters, 60 for the torpedo bombers, 35 for the dive bombers and 25 to keep the fighters occupied.
So to the slaughter. All 72 torpedo bombers disappeared in two passes. None got to a drop point. The left over 190's from the torpedo bombers went after the remaining fighters and dive bombers. Suddenly overwhelming numbers wiped the dive bombers and fighters out. Not one Allied aircraft would return from the first wave. A quick whip around the FW-190A squadrons. They had lost 14 shot down. The ones with the lowest fuel were to return to the carriers to be refuelled, rearmed and launched again. The second wave of German fighters had been launching while the first air battle took place, they were out of the way by the time the first wave returnees arrived back to land on.
Having been warned of the fate of the first wave, the Allies changed the flying order of the air fleet. The Torpedo and dive bombers would mix themselves together so that the fighters just had one group to cover rather than two. It would also give the bombers a chance of some fighting through to the German Fleet. Even though the British commanders knew of the superiority of the new German fighter they had not thought it was that great, just that the first strike against the battlecruisers had been unprepared. The complete destruction of a strike force of 200 aircraft was just unbelievable to them. Their shock would just get worse.
The altering of the layout of the second strike force made no difference. The sixty remaining FW-190A's from the first wave would go in as soon as possible and engage the Griffons and shoot as many down as possible before they had to pull out and return to the carriers. That would release the 90 fresh 190's to take out the bombers. That is exactly what happened. Exactly eleven aircraft returned to land on the British carriers. That is out of the 406 aircraft that started out just what seemed like minutes before. The Germans had lost 32 aircraft.
The shock for the British Commanders was complete. Vice Admiral Holland had been sure that his superiority in carriers would give him an even greater advantage as his aircraft would damage the Axis ships. Admiral Holland had to swallow the bitter pill and do two things. One was to report the happenings to the Admiralty and request permission for a fleet action. Two was to send the carrier force back to Britain. It was no use keeping them in harms way when new aircraft could be loaded on for another attempt to hurt the German Fleet or finish off the strays. Wishful thinking. Sending off the carriers also lost the battle line any sort of air superiority and a dedicated ASW aircraft force to help the destroyers. One thing Admiral Holland advised as a course of action would be to send the Home Fleet from Scapa Flow to rendezvous with Force H to ensure another barrier can be put in front of the Germans if some of the German Fleet gets past Holland's ships into the Atlantic. A flurry of signals go back and forth with the Admiralty confirming the orders and discussing options.
Admiral Holland knows that all of the Axis ships have 16" guns while his ships run from 13" through to 16". The minor warships will not play much of a part in the first part of the battle. It will be up to the big boys to slug it out. Firing orders and ship placement in the battle line will also be important. Which ships can Admiral Holland least afford to lose. Admiral Holland makes his dispositions. All the time the German recon aircraft watch every move and report it to Admiral Albrecht.
The Allied battle line will be:
King George V, Duke of York, Anson, Hood, Vanguard, Temeraire, Majestic, Bulwark, Albion, Devastation, St George, Languedoc, Loire.
Facing them will be:
Bismarck, Scharnhorst, Tirpitz, Gneisenau, Kung Gustav, Drotning Viktoria, Odin, Thor, Valkyrie, Seydlitz, Hindenburg.
Admiral Albrecht's thought was that the Seydlitz and Hindenburg would easily sink or cripple the two smaller Free French battleships at the rear of the line and then be able to take the Devastation and St George. The Axis Combined Fleet (North) kept heading straight South, forcing the British to come at an angle that meant that they could only use their fore turrets for a period of time till they could turn to parallel the Axis ships.
Buzzing around the Allied fleet were Arado spotter aircraft calling the shots for each of the Axis battleships. An amazing edge to have. Air superiority in action.
So the beating began. Unfortunately for Admiral Holland it was his ships that were receiving the beating. Having the aid of spotters made a large difference at the 24-25,000 yard opening ranges. The Axis ships all started hitting with their second and third salvoes. The British ships being fired on by the four German giants were soon in trouble. They had no answer to the 16.5" shell hits. King George V and Duke of York were forced out of the line with engine damage and damage to the main armament. The Anson and Hood both received eight/nine hits each, Hood exploded and forced the rest of the Allied line to have to snake around the wreck and avoid the other three ships left ahead. Anson had had all four turrets knocked out and was slowing, it also had to turn out of the line.
At the other end of the line, the Seydlitz and Hindenburg had found it more difficult to put away the French battleships than thought. A couple of extra hits from the 16.5" did the trick and the Loire had a secondary magazine explosion that opened up the side of the hull down to and below the waterline and reeled out of the line slowly heeling over and eventually capsizing. Languedoc took two hits aft that damaged the steering and starboard shafts leaving the ship turning in circles.
With the four German giants still in full operational order, all turrets still in action, Admiral Holland is starting to feel like the world is coming to an end. He is right. Just two minutes later a salvo from Bismarck lands on and around his flagship, blasting the superstructure into an unrecognisable slag heap. Admiral Holland and his staff have disappeared. Blood and gore are everywhere. Admiral Holland's second in command was aboard the King George V and had died under the guns of the Bismarck as well. Rear Admiral Burnett on the Lancaster found himself in command and had to watch as the Axis battleships simply shot the battle line to bits. Admiral Burnett had to leave the battleships shooting at the Axis ships to do as much damage as possible. The five Scandinavian battleships were starting to look a bit second hand with turrets out of action and fires on three of them.
With the Temeraire firing well it became a target for the Tirpitz which pumped salvo after salvo into the ship. Taking chunks out of whatever was hit. A turret is knocked out but the next six gun salvo hits the Drotning Viktoria and puts that ship out of the Axis line, with a large fire amidships and only one main turret in action. The next salvo from Tirpitz arrives and the Temeraire is hit in the machinery areas, a gout of steam, and the ship comes to a dead stop, drifting on the waves. Again the Allied line has to snake around a wreck, but not before the Majestic sees the Temeraire, almost too late and scrapes down the side. Worst of all the salvo destined for Temeraire lands on Majestic instead. With all of the crippled and sunken ships littering the sea behind them, the Allied line is becoming fractured, only five functional ships are left in the line, shooting at the Axis battleships. All have damage.
On the other side, all four Scharnhorst class have damage, two have fires they are struggling to contain. Secondary systems are being hit and either damaged or destroyed. On the four ships all still have their main armament intact and firing. Kung Gustav has a large fire and has the two forward turrets still firing. Drotning Viktoria is out of the line, followed shortly by the Odin and Thor. The Valkyrie and Hindenburg are still firing well with all turrets while the Seydlitz is down to one turret but still in the line.
The end of the Hood.
The smaller Axis battleships were the worst off. All five of the Scandinavian ships had received major damage (Valkyrie had received damage from Bulwark) and would not go any further out into the Atlantic. Only one of the German battleships had a damaged turret but the damage control officers and engineers thought they would be able to get it back in action.
The five remaining British battleships suddenly found themselves being fired on by two Axis ships each. The three Majestic class drew fire from a Scharnhorst class each and were soon in trouble. As noted before, the Majestic rammed the disabled Temeraire and received major damage while untangling itself. Designed at the end of the first world war the Majestic's were facing technology twenty years better off. Krupp and metallurgy go together hand in hand. The Krupp works had developed the various grades of armour used on the latest German ships, giving much better protection for less weight. On the other hand Krupps had also been experimenting with hardening the armour piercing caps for its shells to go through thicker armour without breaking up. The big 16.5" shells were the first to receive the results of the new work, and the British ships were feeling the end results.
Majestic, Bulwark, Albion, Devastation, and St George were all that was left on the Allied side. Majestic was in trouble and would not be able to remain in the line for long.
Bismarck, Scharnhorst, Tirpitz, Gneisenau, Hindenburg and Seydlitz were still firing from the German side.
Admiral Burnett orders his remaining battleships to close the range "We may not win this fight but we must do as much damage to the Germans as possible!" Only four battleships respond to his order, the Majestic has had enough. It can no longer stay with the fleet. Down by the bow, only one turret left and numerous fires out of control. Within ten minutes an extra large gout of flame from an explosion and the Majestic starts to settle in the water going down bow first. The stern raises out of the water with the props still turning going for its death dive. (A sad end to one of my better creations.)
The British line closes the Axis line, and while this helps to hit the German ships, the reverse is also the same. St George has been exchanging fire with the Seydlitz, and finally scores a telling blow. The B turret on Seydlitz has been out of order, and is now heading for the bottom of the Atlantic. Two shells hit the turret penetrating the ring and blowing it in the air and over the side of the ship. First strike to the British, the Seydlitz is forced out of the line.
Bulwark and Albion are firing well and finally see some results with damage on the Bismarck and Scharnhorst. Not enough to put them out of the line but enough to make them less capable. The return fire was too much to handle and Bulwark and Albion have turrets dismounted and large fires to try to contain. While the Devastation and St George are newer ships, they have continued to receive damage that has accumulated to the point that they follow the Bulwark and Albion, the British line has had enough. Not one British ship is in a condition to keep fighting, all of the remainders and cripples require the help of a dockyard and a lot of bandaids.
The battle ends. The Germans continue on out into the Atlantic. They still have the three carriers and covering ships. The battleships are gaining control of the conflagrations and putting out the fires. But what do you do with all the cripples. Six Axis battleships have various levels of damage and will require going back to the Baltic ports where assistance can be given. The slowest ship can only make 12 knots so that will be the fleet speed. They are to be routed back through the Denmark Strait where the Faroes Gap force under Admiral Lutjens is to meet them and escort them back to Scandinavian waters.
On the other side the older British World War One designed ships had taken a beating despite their 1930's refurbishments. Four out of five had succumbed to their injuries and sunk. From the spectacular end of the Hood to the long and painful loss of the Albion. The other loss was the Loire that proved no match for the smaller German battleships, its 13" guns also proving ineffectual against them. The surviving eight ships were a sorry sight. Dismounted turrets, big swathes of blackened steel where fires had burnt out. Secondary and tertiary armaments had disappeared along with their crews. The more modern ships completed in the later 1930's and early 1940's survived a lot better. The armour while being unable to handle the 16.5" German shells, those ships facing the Scandinavian 15.8" shells took a lot less damage.
Admiral Burnett gathered all his strays together, allocated ships to tow any ships that needed it. He hoped the destroyers would do their job and keep the U-boats at bay. His bunch of cripples would be a U-boat commanders dream target. He also requested the ASW light carrier be turned around and join his ragtag fleet. It would take a long time before his fleet reached the safety of land based air cover.
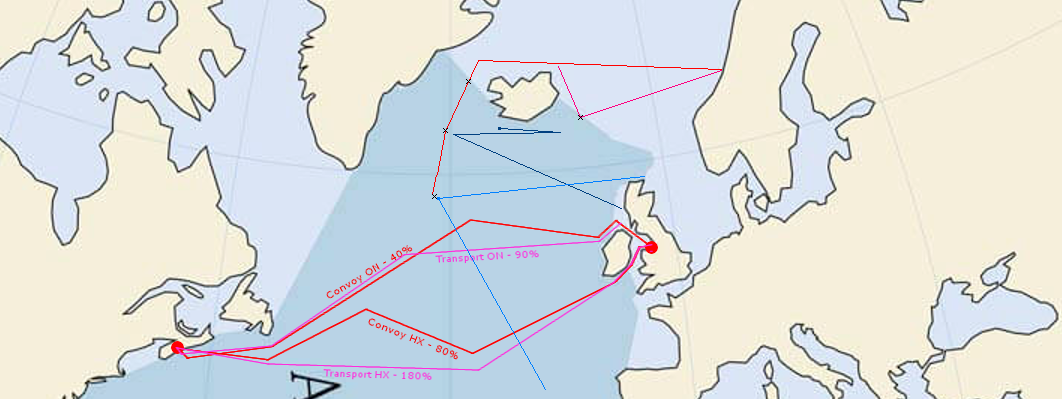
Where to now for Admiral Albrecht? He is proceeding south at 15 knots his arm in a sling. A piece of shrapnel has gone along his arm. He is lucky. A lot more of his sailors are dead. He is receiving signals from Naval High Command. Relayed signals from U-boats at sea that are shadowing and attacking the four convoys at sea in the North Atlantic. Admiral Albrecht is hoping to intercept the one nearest to the United Kingdom as it has also been routed south to try to avoid his ships. He is also aware that the remaining elements of the Home Fleet and Force H may intercept him before he can get to the convoy.
The difference between the two forces? The Allied ships can travel as fast as they can manage, 24-26 knots. They have the luxury of being able to refuel from the tankers that may be in the convoys. The Germans are hoping to be able to capture a few tankers that they can refuel from. This advantage means that Force H and the Home Fleet will get to the Germans before they get to the convoys.
What have the Allies got left to put in front of the Axis forces?