Late 1944 and the RAF is tasked with forcing the German Fleet out of its hiding places in the Norwegian fjords. Using 10,000 pound Tallboy bombs the RAF attack three German capital ships remaining, Bismarck, Tirpitz, and Scharnhorst. The RAF hit the Tirpitz with three bombs which caused the Tirpitz to capsize eventually to be broken up by the Norwegians for scrap. Hitler in yet another fit of rage goes on about his Navy commanders skulking in fjords rather than facing the enemy. The remaining Fleet units are tasked with attacking the next Arctic convoy.
The Battle for Convoy JW60:
The USS Louisiana is back with the Home Fleet and was running as part of the distant cover force for convoy JW60. With so much seapower still available to the Germans a 'greater than them' attitude by the Allies was required. There was so much equipment being sent to Russia in these convoys that the loss of one could set back the Allies by six months. They were that valuable.
The various forces in play.
Germany.
Graf Zeppelin (80air)
Bismarck (8x16.5")
Scharnhorst (8x16.5")
4 x Cruisers
6 x Destroyers
Allied Fleet.
3 x Illustrious CV (84air)
Temeraire (9x16)
Louisiana (8x16)
King George V (9x15")
Duke of York (9x15")
Bulwark (12x15")
Barfleur (9x15")
Devastation (9x15")
Richelieu (8x15")
8 x Cruisers
14 Destroyers
Convoy Escort
2 x CVE
3 x Cruisers
2 x AA Ships
6 x Destroyers
8 x Frigates
4 x Corvettes
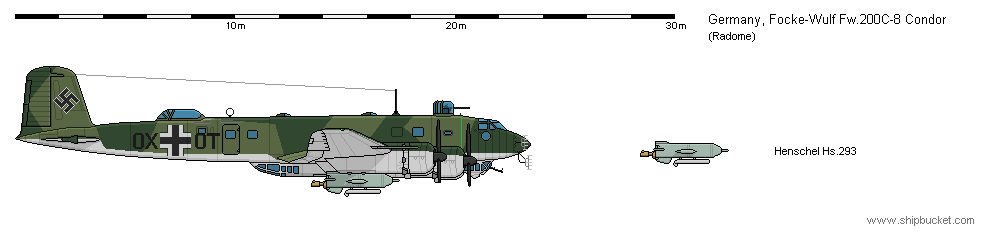
The Graf Zeppelin was still full of fighters, up to the FW190A3. Unfortunately the Allied carriers had the latest Sea Fury fighters aboard which were as good as if not better the the FW190. The strike aircraft and recon aircraft were similarly much better than the earlier models. Air superiority has shifted to the Allies. There is no need for the superiority of spotter aircraft for the guns, RADAR has improved to such a point that individual shells can be followed to their landing points and fall of shot can be called from the Radar operators. The Germans still had some technological advantages like the HS-293 Fritz-X guided bombs which were carried aboard FW-200 and Dornier Do-217 squadrons. These bombs would play their part in the coming battle. (Remember the Roma was sunk by these same bombs the year before.)
The first strike went to the German airforce that sent a five squadron attack force of HE-111 torpedo bombers, Ju-88 bombers and the good old Ju-87 Stuka. The two escort carriers launched their alert fighters and then whatever remaining fighters they had. These were Sea Hurricanes and Gloster Griffons, useful against German bombers at sea without fighter escort. Some of each of the bombers got through and went after the escorts. Both escort carriers, one cruiser and one AA ship were sunk. Two Frigates were crippled and out of the fight (both being sunk by U-boats on their way back to the UK.) Having both the CVE's knocked out in one go was devastating for the escort forces. Both the Combat Air Patrols and the ASW aircraft gone. The Convoy Commodore requested a carrier from the cover force as a replacement but was told to carry on. The covering forces would be moved closer to give fighter cover. Those fighters that had remained from the CVE's landed on the fleet carriers and operated from them as the Convoy CAP.
The news arrived at Admiral Tovey's flagship that the daily recon aircraft over Norway was unable to sight the German fleet at any of its anchorages. The Germans were at sea. Admiral Tovey tasked the Formidable to launch a recon flight to locate the German ships. Formidable launches three De Havilland Sea Hornets to go on the search mission. An hour and a half later the Hornets have located the German Fleet composed as noted above. The German CAP went to chase the Hornets away only to find themselves outclassed. The worm of technology had turned.
What the Germans first attack had achieved was to bring the Allied cover fleet within range of the Do-217's and the HS-293 glider bombs. Northern Command only had 30 aircraft fitted for the HS-293 weapons. All thirty are launched to attack the Allied main fleet. The six Fw-200 Condors are to go in high to draw the CAP, while the Do-217's would go in low and only do a steep climb to operational height when close to the target. On the flipside the Allied fleet has also launched a strike of 145 aircraft at the German Fleet that remained under the eyes of the Hornets. The Allied attack comprised 80 Sea Furies, 60 Spearfish, and a handful of Sea Hornets armed with rockets and light bombs for AA suppression fire. See here for the stats on the Fleet Air Arm Aircraft in use.
The Graf Zeppelin has launched 20 fighters, to firstly chase off the recon aircraft and then follow them back to base and give support to the German HS-293 attack force. The Hornets advise the Fleet they are on their way home with 20 FW190's in pursuit. The carriers launch 30 Sea Furies, the remainder of the fighters held back. Just in case. A large melee between the fighters takes place with losses on both sides. The Sea Furies lose 11 and the FW190's lose 17, only 3 return to the Fleet. They have a problem when they get back. There is nothing left to land on.
The British attack force had been spotted some miles out from the German ships and the Graf Zeppelin had started flying off the 35 fighters it had spotted on deck to go with the 10 aircraft that were up in the CAP. The Sea Furies were in the lead and went for the FW190's. The fighters are fully engaged when the Spearfish come in at wavetop with the Sea Hornets clearing a path through the escorts. A text book attack. The torpedo bombers line up the Graf Zeppelin, Bismarck and Scharnhorst. The Graf Zeppelin and Bismarck receive hits. The Graf Zeppelins hits are terminal. The Graf Zeppelin receives four hits along its length, slows and falls on its side till it capsizes. The FW190's are too far from land to make it. The order is out - get the British aircraft! The FW190's attack fiercely even to the point where when their guns are empty they will try to ram a British aircraft. They have nothing left to lose.
The Bismarck's two hits cause enough damage to slow it down to 22 knots and with the loss of the Zeppelin, the fleet turns round and heads for home.
The conditions over and around the Allied Fleet is confusing. The 20 FW190's sent to chase off the recon aircraft then escort the HS-293 aircraft are now up with the FW-200 Condors and moving at about 140-150 mph. The Do-217's are at low level and also traveling at the 140-150 mph speed. The Allied attack force survivors, having achieved their objectives are on their way back to the carriers, with the remaining FW190's in hot pursuit. That lot of aircraft are moving at 250+mph and pass the German attack force who are only a few minutes out and about to be attacked by the enlarged Allied CAP which launched 30 Sea Furies to go after the Condors and FW190's.
Hell, even though I have all this in front of me I am still confused as to what is where and when will it be where it should be.
The Allied attack force arrives back and most are short of fuel as with the FW190's harrying them all the way home, extra fuel had been used. The FW190's had by now either run out of fuel, been shot down or deliberately crashed. The carriers turn in to the wind to allow them to land on. This is the point where the 24 Do-217's zoom to launch their HS-293's at the fleet. This maneuver is spotted by the Fleets radar operators and warning shouts ring out over the radio net. The Hornets (9 of them) turn out of the landing circuits and go after the Do-217's. With 3 carriers and eight battleships to choose from, the Do-217's had received their priority target orders before launch. Four each for the carriers, and at least two each for as many battleships as could be targeted. Each bomber can only control its own bomb. Shoot it down and its bomb is likely to go haywire and crash. It is up to the nine Hornets to shoot down the controller aircraft. But which will get there first, the bombs or the Hornets. The Sea Furies above, hear the calls, but can do nothing about it. They are fully engaged trying to stop the Condors, those four remaining also launch their bombs and have to be considered priority targets. The FW190's escorting the Condors are proving a nuisance.
The Hornets make a sterling effort and disrupt and shoot down eighteen of the twenty-four aircraft. Above the Sea Furies shoot down the Condors and FW190's. It starts raining HS-293's as the uncontrolled bombs hit the sea and explode. It is the ones still under control that are the problem. 6 hits. 2 hits on the Illustrious and that ship is doomed. No power listing to port with the recently landed on aircraft sliding over the side. The forward magazine explodes, blowing out the bottom of the ship. Two hits on the Temeraire, one hit on the Louisiana and one hit on the Barfleur. The Temeraire is crippled and staggers out of the line, the Louisiana is lucky and the hit is aft damaging the prop shafts, it too is crippled and will require a dockyard for repairs. The Barfleur is unlucky and the hit goes through the fore deck and explodes in the forward magazines the ship explodes and sinks rapidly as the bow breaks away and the bulkheads collapse, the hull forcing itself under the sea at 20 knots.
There are no German aircraft left. All of the Graf Zeppelin's complement of FW190's are gone the 24 Do-217's are all shot down along with the 6 Condors. The remaining Allied aircraft aboard the two carriers rule the skies. They have a small window of opportunity to attack the German Battle Fleet before it comes within range of the land based fighter cover. 32 Spearfish, 8 Sea Hornets, and 28 Sea Furies are all the undamaged aircraft left of the 240+ aircraft the three carriers started with. The order is given to launch the strike while the undamaged battleships head off after the Germans at 26 knots. The German battleships will need to be slowed down further to let the fleet get at them.
The strike force goes in at wavetop, the Spearfish are to target the battleships, half the Sea Fury's are to run flak suppression ahead of the Spearfish, the rest of the Sea Fury's and Sea Hornets are to take out the cruisers and destroyers. Even for 68 aircraft, the flak aboard the 12 German ships is impressive and losses to the strike force aircraft are taken. The Spearfish are in enough numbers to do the job, Three more hits on the Bismarck and it is dead in the water four hits on the Scharnhorst and it is steaming round and round in small circles its rudders and props damaged beyond repair except in the hands of a dockyard. Of the smaller vessels, 2 cruisers and four destroyers were sunk, leaving just two heavy cruisers and two destroyers left, all of them have damage. The Allied battleships are three to four hours away and coming on strong. The heavy cruisers are to try to tow the two crippled battleships, but the tow speed has to be so slow that it will still take hours to reach fighter and bomber cover. To remind the Germans as to who has air superiority, a couple of Hornets are playing tag in and out of the clouds as they keep an eye on the Germans. To make matters worse neither battleship has all its main armament in action. One has three turrets the other only two. The German radar is not as good as the Allied units. All the Germans can pray for is air cover.
Their prayers are not answered, just over three hours later the Bismarck's radar operators advise they have five large and eight smaller blips on their screens. The German Admiral makes the decision. He orders the two heavy cruisers to drop the tows and take the destroyers with them to safety. Any further losses would be a waste. Those four ships Commanders are happy to be on their way.
Both sides are at action stations with the King George V in the lead of the five Allied battleships. The Germans fire first and Admiral Tovey smiles as he realises the Germans armaments are crippled. The Bulwark and Richelieu are to take the Bismarck with two turrets while the King George V, Duke of York and Devastation take on the Scharnhorst with three turrets operating. The cannonade begins. The German ships are unable to maneuver and are sitting ducks. Only three hits are scored on the Allied ships before the main armaments of the German ships are silenced. Four of the accompanying Z class destroyers are ordered to finish off the hulks with torpedoes. Four more hits on each and the two battleships are sinking, their flags still flying. Only 550 survivors are pulled from the frigid waters out of the 5,000 odd men aboard.
Hitler, as can be expected, throws another tantrum. Admiral Doenitz walks out and refuses to take any further orders from that 'maniac'. He is deeply saddened by the lack of respect shown to the dead thrown away by that mans orders. Doenitz will continue to run the Navy to the best of his ability, which is considerable. His orders to the remaining Fleet units in Norway are to return to the Baltic to assist the Army as it retreats along the coast. Only the U-Boats are left to dispute control of the North Atlantic.
Return to Sea Battles page