The conversion of the Queen Rafohy from a battleship to an aircraft carrier, meant there were four twin 15" turrets and guns available to provide the main weapons for a class of Monitors. Lemuria had seen the use that the Royal Navy had made of Monitors and even the use that the Matsiatra class were used for as monitors in WW1. The question was how to break up the four mountings, single turret ships as per the Royal Navy model (Erebus) or they had been made aware of the Australis ships with one turret fore and aft (Echidna, Cassowary). The issue with monitor type ships was their speed in the Royal Navy versions. The RN ships only had to cross the channel to be in the war or maybe to the Mediterannean. Small distances, where speed was not a major factor. Lemuria was quite a bit further away from those battle areas that it might be fighting in. Higher speed would be a necessity. The Australis layout would suit Lemuria better.
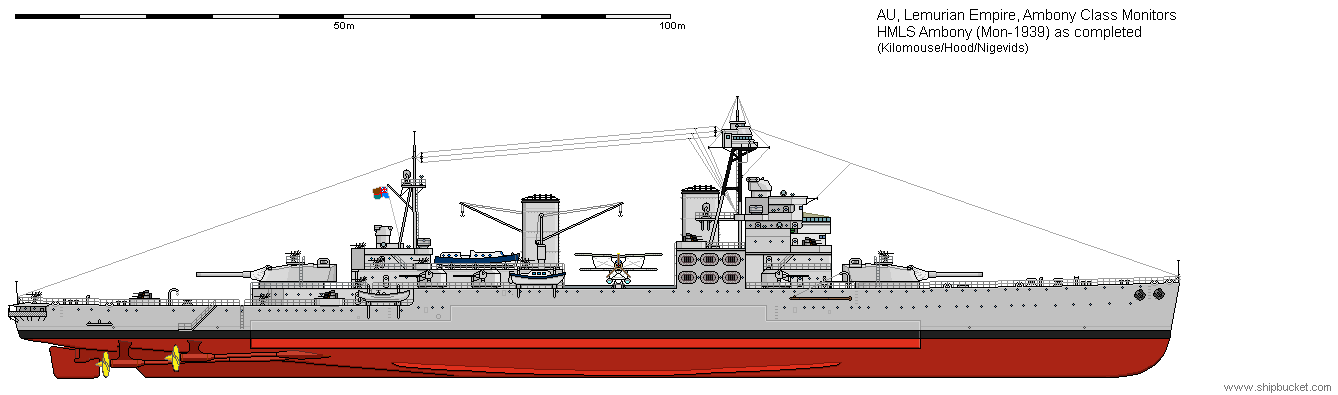
The Ambony class were based on previous classes of cruiser and the rebuilding items on the Andriananjavonana class. The bridge design incorporated the aircraft hangar to go with the cross deck catapult. It was felt that the ships would benefit from being able to deploy its own spotter aircraft. Other changes included a full spotting top on the tripod, again for controlling the main guns for inland shoots, where the ships aircraft might not be available due to enemy interdiction. The ships were armoured for use inshore where field artillery and aircraft would be major threats. An eight inch belt and four inch deck were provided. The Ambony was about the size of the Andriananjavonana class which was armed with 8x12" (7,200). The 4x15" (7,800) actually fired a heavier broadside. So although the ships were classed as monitors they could easily have been classed as battlecruisers too. They were a full Captains ride and were just as likely to have a Commodore or Admiral aboard depending on their role.
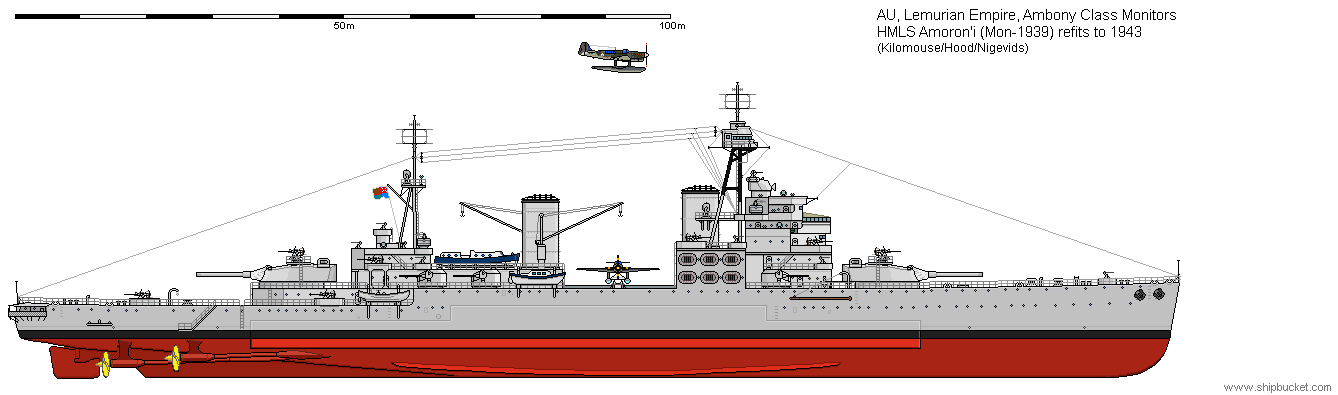
By the end of 1943 only the Amoron'i looked like the above drawing. 40mm sprouting everywhere with the predictors for them being placed in space previously occupied by the 20mm. The aircraft handling facilities had been retained and the aircraft improved to the latest model available. Radar made an appearance on the gun directors and at the mast tops providing search capabilities for both sea and air targets.
So what happened to the Ambony? The Ambony was fully engaged around the Solomon Islands providing fire support for the Allied forces on Guadalcanal. The Japanese land forces reported the presence of a battleship in the area due to the 15" shells being fired by the Ambony. To counter this the Japanese added the Konishi to the next effort at clearing the Allied forces out of the area. You can see whats coming, four 15" against six 16", must be an even contest. It is when you count in the much superior radar the Allies had. The equaling factor for the Japanese was the 24" Long Lance torpedo. The Japanese forces were coming down the slot, the Konishi had been mis-identified as another heavy cruiser, giving the Japanese the battlecruiser, two heavy cruisers, two light cruisers and eight destroyers escorting three transport ships. The Allied forces had Australis, Lemurian, US, and Zealandian ships. This mish-mash had never worked together before and were scattered all around the area to where they were best suited for the ships they had. Lemuria had the Ambony a light cruiser and two destroyers. These were tasked with covering the landing and bombardment areas usually used by the Japanese. Lemuria held the left side, Australis the right. These two forces had acted together in the past and had the same codes and signaling. The US had three cruisers and destroyers above Savo Island covering the passages from the north. The two Zealandian cruisers were away to the east acting as the back up force to assist where they would be needed.
The major Japanese ships arrived in the battle arena at 25 knots, timing their arrival for 12.30am. They expected opposition and were ready to fight. The Konishi and the two Heavy cruisers were to shell Henderson Field while the light cruisers and destroyers got the transports to the landing site. The best laid plans do not always run smoothly. The Konishi and the cruisers opened fire at long range on the airfield, it was such a big target they felt they could not miss. After just two salvoes at the airfield four very large splashes arrived around the Konishi. The 'battleship' had opened fire. The Captain of the Konishi ordered the cruisers to continue the bombardment while the Konishi would take care of the 'battleship'. The two big ships continued to fire at each other, but the Ambony was hitting the Konishi more times than what it was receiving. Both were incurring damage they were not really designed to take. The Konishi was a battlecruiser and 15" hits were causing considerable damage. Konishi had one turret already knocked out and both were firing four gun salvoes. The knockout blow for both the major ships arrived at almost identical times. The Captain of the Konishi had ordered the two heavy cruisers to fire torpedoes at the Lemurian ships, Ambony received two torpedo hits just after its previous salvo, the four shells went out to the Konishi, three hits and a near miss. One of the hits triggered the rear 3.9" magazine, opening the hull to the sea and damaging the machinery, reducing the Konishi's speed. The Japanese Admiral sounded the recall and ordered the Konishi to make best speed north. Konishi and the two heavies now came under fire from the Australis cruisers that had been racing to join the fight from the west. The Konishi was just too big for the 6" and 8" guns to do much damage and again the Japanese heavies fired torpedoes. One hit on an Australis light cruiser made the others turn away allowing the Japanese ships to escape north. The Japanese cruisers, destroyers and transports had headed for the beach head they were to land the troops and supplies on. The US force came around the back of Savo Island and caught the Japanese ships against the land. The transports were ordered to beach themselves and try and unload as much as possible before Allied air attacks would destroy them. The Japanese destroyers fired half their torpedoes at the US ships, that's 32 torpedoes in the water. The US cruisers turned course and ran right into the shoal of torpedoes. All three received hits, one sunk two damaged. The Japanese cruisers and destroyers joined the Konishi all heading north. Leaving broken and sinking ships behind them.
The Ambony's two torpedo hits proved terminal in the end. The first hit just aft of the armoured belt doing damage to the props, shafts and an engine room. It was the second hit that proved fatal in the end. It hit inline with the fore funnel and hangar. It was the aircraft fuel tanks that cracked open and caused a major fire that set off the 4.5" magazine, blasting the hull open to the sea. The ship came to a stop. The Japanese cruiser saw this and fired its last bank of torpedoes at what was now a sitting duck. Boom, boom, another two hits and the Ambony was down by the head and starting to capsize. The Lemurian cruiser came to the disengaged side and took off what survivors it could, easing away from the doomed ship just before it finally turned on its beam ends and disappeared from view.
The Konishi did not survive either, Admiral Halsey sent off his attack planes after the Konishi which caught and sunk it, with torpedo and bomb hits. Another cruiser and two destroyers joining the Konishi in Davy Jones Locker before they could escape out of range.
The Amoron'i had gone to Europe and fought in the battles in Norway and along the coast of Belgium and France as the German Panzers swept all before them. With the fall of France, the Amoron'i joined Force H, but there was little 'bombardment' duties with Force H. The Amoron'i went back to the dockyards at Colombo for a refit of new radar and updated equipment. More 20mm were added as the ships next destination was the Eastern Med with Admiral Cunningham's fleet. Hardly had the Amoron'i arrived when it was sent with other bombardment units to bombard enemy concentrations and supply dumps near the Bardia - Tobruk road. Returning to Alexandria unscathed. The bombardment group bombarded the Derna - Tobruk road inciting a curious battle where the Amoron'i fought against a regiment of tanks forcing them to abandon the road and head into the desert, losing many tanks and trucks in the process. This did prod the German airforce into action and the bombardment group were attacked by bombers and dive-bombers losing the Ladybird, the Amoron'i took two bomb hits but was still in fighting condition. A week in dockyard hands repaired the damage. During this period the Japanese attacked US and Allied forces. This caused the withdrawal of ships from the Mediterannean Fleet to face the Japanese threat. One of those was the Ambony which I describe its service above.
During early 1942 through to June 1942, the Amoron'i was part of the Western Desert Bombardment group, which besides its bombardment duties also escorted convoys from Alexandria to Tobruk. Air attack was a constant threat and the Amoron'i led a charmed life only receiving two bomb hits in six months of duty while many ships around it were sunk. These duties stopped with the fall of Tobruk and the Amoron'i was used to hold the sea end of the El Alamein defensive line. A stalemate ensued till the end of October 1942 when the Allied forces had gathered enough strength to take on the Afrika Korps. Days of bombardment were followed by overwhelming force which smashed through the Axis defensive lines and then chased Rommel's forces back along the coastal road to Benghazi. The Amoron'i followed, providing fire support when requested and also as escort to the transports bringing supplies to the most forward harbour to the front lines. With major air cover, the chances of being bombed, were much less. It did not mean to relax vigilance as the Germans tried to interdict the supplies coming along the coast road and by sea. The odd Ju88 would break through the air defences and go for whatever was closest. Streams of AA would pock mark the sky, while Allied aircraft would be chasing the Ju88 also trying to shoot it down. The Amoron'i was ordered home in September 1942 for a full refit of AA predictors, radar and other essential equipment.
The Amoron'i rejoined the fleet in early 1943. It was sent to the new Commonwealth Pacific Fleet, where it would join several other old 15" battleships in the bombardment role. It would alternate between that duty and escort to the Fleet Supply Train. The Amoron'i got to fire at bits of dirt and the odd aircraft, but no surface vessels ever came close enough to be fired at. Those duties continued through 1944 and 1945. At wars end the Amoron'i returned to Lemuria and joined Coast Defence Squadron (East) as Flagship. The Amoron'i continued these duties through to 1950 when the ship was offered for sale. A cruiser sized vessel with big guns was a very valuable commodity and several offers were received. The Amoron'i was sold to Brazil which had a large coastline and in 1950 still had few airports along that coast. The aircraft handling equipment was the best selling point. After a refit at Colombo the Amoron'i went to Brazil, becoming the Amazonas and serving to 1975, when it was retired and sold for scrap.