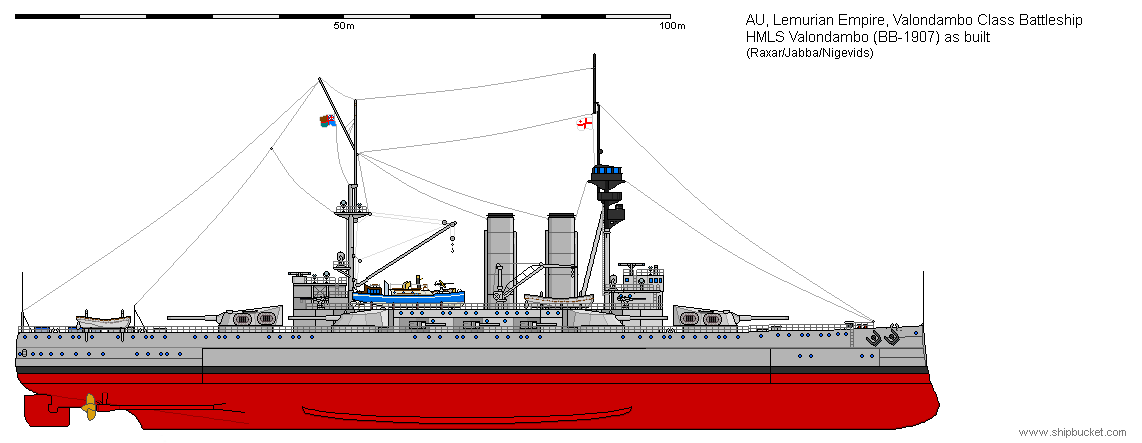
HMLS Valondambo (BB-1907)
The Royal Navy King Edward the 7th class battleships were also rated as semi-dreadnoughts due to the secondary 9.2" guns that were fitted in turrets at the corners of the superstructure citadel. This gave the ships of the class 12", 9.2" and 6" guns whose splashes at long ranges could be mistaken for each other. A nightmare for the rangefinders and directors. The Dreadnought was started after this class was laid down and completed before the last of this class was finished. At one stroke eight brand new battleships were obsolete. The Lemurian Navy had, as usual, received the plans for the K.E. VII class with the usual demand "Build as many as possible".
The Lemurian designers did not like the design and figured they could do
better. They had the single 12" turrets designed for the Matsiatra class coast
defence ships. Fitted with the same 12" as the main twin turrets, they would
replace the single 9.2". While this design could be classed as an 'all big
gun' battleship, the Dreadnought was completed a year or so before the
Valondambo. It would be another five years before Lemuria's first Dreadnought
joined the fleet. Going from the 12" to 6" secondary guns, the spotters had no
problem with differentiating the fall of shot between the guns. This was made
easier in 1912-13 when a simple director was fitted on the bridge for the 12"
which was followed with another director on the afterbridge for the 6", but
could also be use for the 12" if the one on the bridge had been knocked out. By
the end of the war two 3" AA had been added.
So I now have two pre-Dreadnought battleships with a reasonable armament that
are definitely going to be obsolete at the end of World War One. The normal
progress would be as training ships for a few years then a transformation to
Area Defence Vessels. That would give Lemuria four single 12" in turrets and two
twin 12" turrets. If they could source another two twin 12" (from other
Commonwealth navies) they could produce another battlecruiser as an improved
Andriananjavonana class ship. The four single 12" I am undecided on. I could do
two monitors with a 12" fore and aft, or else just put them into coast defence
shore positions around the Palk Straight. Still, I like to design ships so I
feel another couple of drawings might appear in the future.
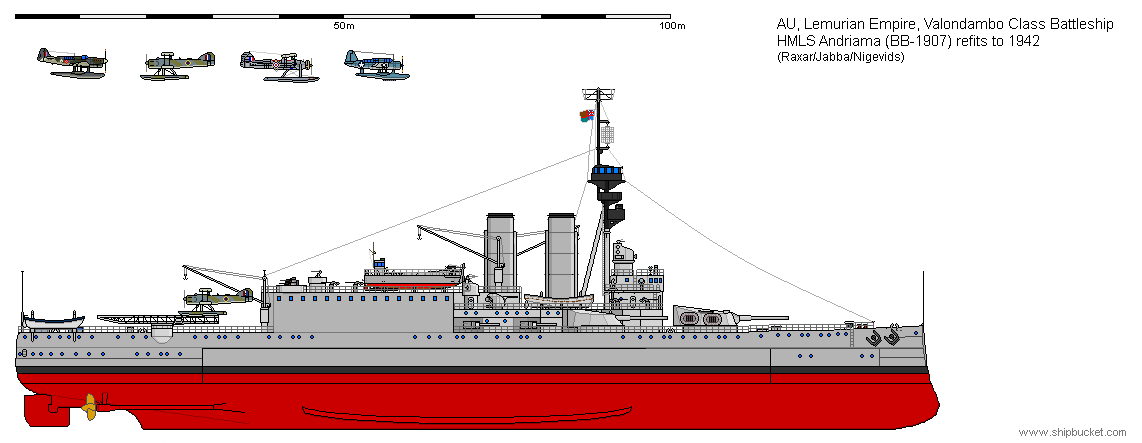
Through all of the Commonwealth countries, there must be at least a dozen Area
Defence Vessels to use around the world. I have been looking at maps as to where
these valuable ships might be placed. Not only having their own aircraft for
local defence they were also base ships for the big flying boats that would do
the long range observation and ASW tasks. Lets see places I can find for
Lemuria's pair. One of the earliest destinations is the Cocos - Keeling Islands
which helps guard the entrances into the Indian Ocean from Asia. The other major
placement area, early in the war, is St Paul Island which sits on the Perth to
South Africa trade route. A major part of the route from Australia to Europe via
the west coast of Africa.
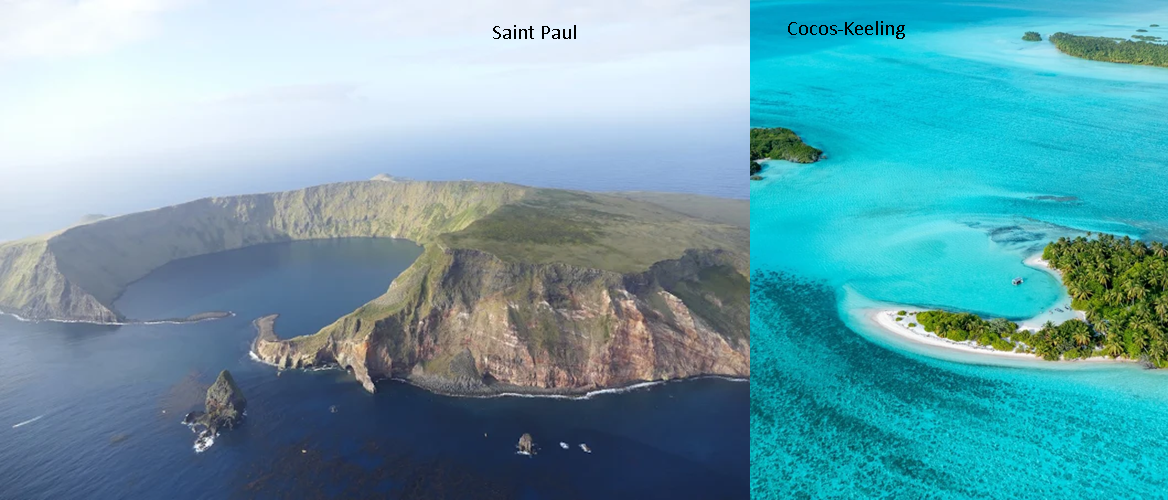
The Andriama was ordered to Saint Paul on the outbreak of war. The thinking was
that Australia would send troops to Europe and North Africa via the trade route
that passed by Saint Paul. With aircraft out of Perth and from Durban, the
Andriama was used to fill the gap in between. Long ranged flying boats based on
Saint Paul worked well in this. The Valondambo was used to escort Lemurian
troops to North Africa, which took care of 1939 and a bit of 1940. The escort
work continued with trips from Trincomalee to Singapore and Darwin, escorting
convoys both ways. Being able to provide local air cover around the convoys was
a great help. The Valondambo was always going to be sent to Cocos-Keeling if an
Asian war broke out. The Valondambo took up its war station and initiated air
coverage out to the passages through the Dutch East Indies keeping a watch for
submarines and merchant raiders. 1st March 1942, Nagumo's carrier force bursts
through the Sunda Strait and into the Indian Ocean. Darwin is hit hard with a
lot of shipping losses. A dozen bombers with fighters turned up at the
Cocos-Keeling Islands. Catching the Valondambo in harbour and sinking it.
January 1941, the raider Kormorant knew there was a depot ship based at St Paul
as a base for the long range flying boats. The Kormorant's Kapitan decided he
should be able to make a run at the depot ship from the south and be in position
to make an overnight run into range of St Paul, arriving with the dawn. The
Kapitan missed by five minutes. The way St Paul is configured, the big flying
boats take off to the south and then turn east or west to their patrol areas.
The Kormorant was spotted while still outside its weapons range. The Kapitan
ordered his two Arado's to be put overboard so they could take off and help with
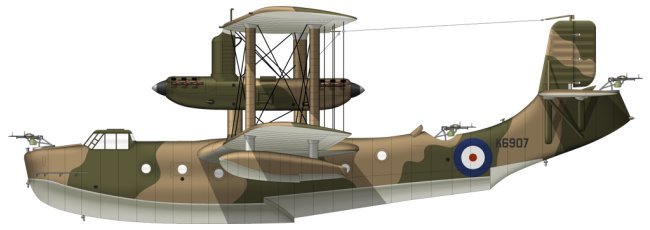
the battle against the two Short Singapore flying boats that were now lining up
to attack him. The Short Singapore's were armed with depth charges, which when
set to minimum setting would blast the side of Kormorant in. The Kormorant's
Arado's had taken off and were turning to intercept the Singapore's when the
lookouts advised more aircraft were coming out from the island. Two Swordfish
and a Fletcher Cormorant (Atlantean Floatplane type) which were the Island's
dawn patrol, came into sight of the Kormorant. The Kormorant plowed on toward
the island confident its aircraft could handle the Allied aircraft. The Kapitan
really wanted to sink the depot ship and so take out the flying boat support,
freeing the trade route for the Kormorant to attack the shipping going past. The
Andriama had been caught on the hop. Its crew had been launching aircraft for
the dawn patrol when the call came that the raider was getting very close. The
Andriama went to red alert with all of the guns to be manned. The masthead
lookout on the Kormorant gave a report that froze the Kapitan's blood. "Sir,
there is capital ships fighting top in the harbour". As far as the Kapitan knew
there was no major warships within a thousand kilometers of him. The Kormorant
was just coming into the 15,000 yard range that his old 5.9" guns had. The
Kapitan decided to open fire and see what happened. He had three 5.9" on each
broadside and would zig zag closer so that both side could take turns at firing.
Back to the air. If the two Arado's could win the air war then they would be
able to spot for the Kormorant's guns. But it was five to two. Then the odds got
worse as the last fighter launched by the Andriama came out to join the battle,
a Blackburn Roc floatplane. The Arado commander decided it was the Singapore's
that would be the greatest danger to his ship and they had to go. But the
Singapore's proved to be tough adversaries with machine guns sprouting fore and
aft, and the pilots knew how to fly so that they could cover each other. Both
Singapore's are damaged and pull out of the fight, returning to the island. One
Arado had been damaged but had to stay in the fight. The Cormorant and Roc now
attacked the Arados, losing the Roc but shooting down both Arado's. The
Swordfish now became the spotters to the Andriama's fall of shot. On the bridge
of the Kormorant, all eyes went to the three great splashes, as large shells
fell in line but just short of the ship. The Kapitan ordered 'open fire' but his
director could not see a ship to fire on as the land curved around to conceal
it. The Kormorant would have to alter course to the north east to open up the
harbour to see the ship firing at it. Another set of splashes, this time even
nearer, splinters hitting the ship and killing crew in exposed positions. The
Kapitan had to make a quick decision, go on against an adversary that looked
like it was superior to his ship or withdraw. Neither option was very palatable.
Retreat would not help, the Kormorant would have aircraft following it
everywhere it went. And when the superior ship came out and ran the Kormorant
down, it would be sunk. No, the Kapitan decided it would be better to press on
and catch the Allied ship in harbour where it would not be able to dodge the
Kormorant's guns.
30 seconds later, the Kapitan's options were reduced to nothing. A 12" shell hit
took away all options. Exploding in the engine room the Kormorant lost all power
and came to a stop. The Kapitan bent over and kissed his arse goodbye. Thirty
second later two more shell hits sealed the Kormorant's fate. One opened the
side of the ship to the sea the other set off the aft 5.9" magazine, blasting
the aft part of the ship apart. On receiving the results of those hits from the
Swordfish, the Andriama ceased fire and sent its landing craft out to help the
survivors.
The Andriama survived the war and returned to Lemuria. The nearly forty year old
ship was had it. The crew was paid off and the ship sold to the breakers yard.
| Displacement | 17,500 tons std, 20,750 tons full load |
17,000 tons std, 20,200 tons full load (as ADV) |
| Length | 454 ft | |
| Breadth | 78 ft | |
| Draught | 28 ft | |
| Machinery | 2 shaft Triple Expansion, 18,000ihp | |
| Speed | 19 knots | |
| Range | 5000 miles at 12 knots | |
| Armour | 12" side, 2.5" deck, 12-8" turrets | |
| Armament | As built 8 x 12" (2x2, 4x1) 6 x 6" (6x1) 4 x 4" (4x1) 2x3" AA (2x1) added 1917 |
As ADV 1942 4 x 12" (1x2, 2x1) 4 x 6" (4x1) 4 x 4" (2x2) 8 x 2pd (2x4) 8 x 20mm (8x1) |
| Aircraft | nil | 6-8 depending on size and type |
| Complement | 800 | 600+Cadets+Marines depending on use |
| Notes | Valondambo Andriama |
|
The Royal Navy King Edward VII class had the awkward 9.2" guns in the wing
positions. The 12" Lemuria put there worked much better.
